Flume架構與源碼分析-核心組件分析-2
4、整體流程
從以上部分我們可以看出,不管是Source還是Sink都依賴Channel,那么啟動時應該先啟動Channel然后再啟動Source或Sink即可。
Flume有兩種啟動方式:使用EmbeddedAgent內嵌在Java應用中或使用Application單獨啟動一個進程,此處我們已Application分析為主。
首先進入org.apache.flume.node.Application的main方法啟動:
Java代碼
- //1、設置默認值啟動參數、參數是否必須的
- Options options = new Options();
- Option option = new Option("n", "name", true, "the name of this agent");
- option.setRequired(true);
- options.addOption(option);
- option = new Option("f", "conf-file", true,
- "specify a config file (required if -z missing)");
- option.setRequired(false);
- options.addOption(option);
- //2、接著解析命令行參數
- CommandLineParser parser = new GnuParser();
- CommandLine commandLine = parser.parse(options, args);
- String agentName = commandLine.getOptionValue('n');
- boolean reload = !commandLine.hasOption("no-reload-conf");
- if (commandLine.hasOption('z') || commandLine.hasOption("zkConnString")) {
- isZkConfigured = true;
- }
- if (isZkConfigured) {
- //3、如果是通過ZooKeeper配置,則使用ZooKeeper參數啟動,此處忽略,我們以配置文件講解
- } else {
- //4、打開配置文件,如果不存在則快速失敗
- File configurationFile = new File(commandLine.getOptionValue('f'));
- if (!configurationFile.exists()) {
- throw new ParseException(
- "The specified configuration file does not exist: " + path);
- }
- List<LifecycleAware> components = Lists.newArrayList();
- if (reload) { //5、如果需要定期reload配置文件,則走如下方式
- //5.1、此處使用Guava提供的事件總線
- EventBus eventBus = new EventBus(agentName + "-event-bus");
- //5.2、讀取配置文件,使用定期輪訓拉起策略,默認30s拉取一次
- PollingPropertiesFileConfigurationProvider configurationProvider =
- new PollingPropertiesFileConfigurationProvider(
- agentName, configurationFile, eventBus, 30);
- components.add(configurationProvider);
- application = new Application(components); //5.3、向Application注冊組件
- //5.4、向事件總線注冊本應用,EventBus會自動注冊Application中使用@Subscribe聲明的方法
- eventBus.register(application);
- } else { //5、配置文件不支持定期reload
- PropertiesFileConfigurationProvider configurationProvider =
- new PropertiesFileConfigurationProvider(
- agentName, configurationFile);
- application = new Application();
- //6.2、直接使用配置文件初始化Flume組件
- application.handleConfigurationEvent(configurationProvider
- .getConfiguration());
- }
- }
- //7、啟動Flume應用
- application.start();
- //8、注冊虛擬機關閉鉤子,當虛擬機關閉時調用Application的stop方法進行終止
- final Application appReference = application;
- Runtime.getRuntime().addShutdownHook(new Thread("agent-shutdown-hook") {
- @Override
- public void run() {
- appReference.stop();
- }
- });
以上流程只提取了核心代碼中的一部分,比如ZK的實現直接忽略了,而Flume啟動大體流程如下:
1、讀取命令行參數;
2、讀取配置文件;
3、根據是否需要reload使用不同的策略初始化Flume;如果需要reload,則使用Guava的事件總線實現,Application的handleConfigurationEvent是事件訂閱者,PollingPropertiesFileConfigurationProvider是事件發布者,其會定期輪訓檢查文件是否變更,如果變更則重新讀取配置文件,發布配置文件事件變更,而handleConfigurationEvent會收到該配置變更重新進行初始化;
4、啟動Application,并注冊虛擬機關閉鉤子。
handleConfigurationEvent方法比較簡單,首先調用了stopAllComponents停止所有組件,接著調用startAllComponents使用配置文件初始化所有組件:
Java代碼
- @Subscribe
- public synchronized void handleConfigurationEvent(MaterializedConfiguration conf) {
- stopAllComponents();
- startAllComponents(conf);
- }
MaterializedConfiguration存儲Flume運行時需要的組件:Source、Channel、Sink、SourceRunner、SinkRunner等,其是通過ConfigurationProvider進行初始化獲取,比如PollingPropertiesFileConfigurationProvider會讀取配置文件然后進行組件的初始化。
對于startAllComponents實現大體如下:
Java代碼
- //1、首先啟動Channel
- supervisor.supervise(Channels,
- new SupervisorPolicy.AlwaysRestartPolicy(), LifecycleState.START);
- //2、確保所有Channel是否都已啟動
- for(Channel ch: materializedConfiguration.getChannels().values()){
- while(ch.getLifecycleState() != LifecycleState.START
- && !supervisor.isComponentInErrorState(ch)){
- try {
- Thread.sleep(500);
- } catch (InterruptedException e) {
- Throwables.propagate(e);
- }
- }
- }
- //3、啟動SinkRunner
- supervisor.supervise(SinkRunners,
- new SupervisorPolicy.AlwaysRestartPolicy(), LifecycleState.START);
- //4、啟動SourceRunner
- supervisor.supervise(SourceRunner,
- new SupervisorPolicy.AlwaysRestartPolicy(), LifecycleState.START);
- //5、初始化監控服務
- this.loadMonitoring();
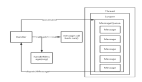
從如下代碼中可以看到,首先要準備好Channel,因為Source和Sink會操作它,對于Channel如果初始化失敗則整個流程是失敗的;然后啟動SinkRunner,先準備好消費者;接著啟動SourceRunner開始進行采集日志。此處我們發現有兩個單獨的組件LifecycleSupervisor和MonitorService,一個是組件守護哨兵,一個是監控服務。守護哨兵對這些組件進行守護,假設出問題了默認策略是自動重啟這些組件。
對于stopAllComponents實現大體如下:
Java代碼
- //1、首先停止SourceRunner
- supervisor.unsupervise(SourceRunners);
- //2、接著停止SinkRunner
- supervisor.unsupervise(SinkRunners);
- //3、然后停止Channel
- supervisor.unsupervise(Channels);
- //4、***停止MonitorService
- monitorServer.stop();
此處可以看出,停止的順序是Source、Sink、Channel,即先停止生產,再停止消費,***停止管道。
Application中的start方法代碼實現如下:
Java代碼
- public synchronized void start() {
- for(LifecycleAware component : components) {
- supervisor.supervise(component,
- new SupervisorPolicy.AlwaysRestartPolicy(), LifecycleState.START);
- }
- }
其循環Application注冊的組件,然后守護哨兵對它進行守護,默認策略是出現問題會自動重啟組件,假設我們支持reload配置文件,則之前啟動Application時注冊過PollingPropertiesFileConfigurationProvider組件,即該組件會被守護哨兵守護著,出現問題默認策略自動重啟。
而Application關閉執行了如下動作:
Java代碼
- public synchronized void stop() {
- supervisor.stop();
- if(monitorServer != null) {
- monitorServer.stop();
- }
- }
即關閉守護哨兵和監控服務。
到此基本的Application分析結束了,我們還有很多疑問,守護哨兵怎么實現的。
整體流程可以總結為:
1、首先初始化命令行配置;
2、接著讀取配置文件;
3、根據是否需要reload初始化配置文件中的組件;如果需要reload會使用Guava事件總線進行發布訂閱變化;
4、接著創建Application,創建守護哨兵,并先停止所有組件,接著啟動所有組件;啟動順序:Channel、SinkRunner、SourceRunner,并把這些組件注冊給守護哨兵、初始化監控服務;停止順序:SourceRunner、SinkRunner、Channel;
5、如果配置文件需要定期reload,則需要注冊Polling***ConfigurationProvider到守護哨兵;
6、***注冊虛擬機關閉鉤子,停止守護哨兵和監控服務。
輪訓實現的SourceRunner 和SinkRunner會創建一個線程進行工作,之前已經介紹了其工作方式。接下來我們看下守護哨兵的實現。
首先創建LifecycleSupervisor:
Java代碼
- //1、用于存放被守護的組件
- supervisedProcesses = new HashMap<LifecycleAware, Supervisoree>();
- //2、用于存放正在被監控的組件
- monitorFutures = new HashMap<LifecycleAware, ScheduledFuture<?>>();
- //3、創建監控服務線程池
- monitorService = new ScheduledThreadPoolExecutor(10,
- new ThreadFactoryBuilder().setNameFormat(
- "lifecycleSupervisor-" + Thread.currentThread().getId() + "-%d")
- .build());
- monitorService.setMaximumPoolSize(20);
- monitorService.setKeepAliveTime(30, TimeUnit.SECONDS);
- //4、定期清理被取消的組件
- purger = new Purger();
- //4.1、默認不進行清理
- needToPurge = false;
LifecycleSupervisor啟動時會進行如下操作:
Java代碼
- public synchronized void start() {
- monitorService.scheduleWithFixedDelay(purger, 2, 2, TimeUnit.HOURS);
- lifecycleState = LifecycleState.START;
- }
首先每隔兩個小時執行清理組件,然后改變狀態為啟動。而LifecycleSupervisor停止時直接停止了監控服務,然后更新守護組件狀態為STOP:
Java代碼
- //1、首先停止守護監控服務
- if (monitorService != null) {
- monitorService.shutdown();
- try {
- monitorService.awaitTermination(10, TimeUnit.SECONDS);
- } catch (InterruptedException e) {
- logger.error("Interrupted while waiting for monitor service to stop");
- }
- }
- //2、更新所有守護組件狀態為STOP,并調用組件的stop方法進行停止
- for (final Entry<LifecycleAware, Supervisoree> entry : supervisedProcesses.entrySet()) {
- if (entry.getKey().getLifecycleState().equals(LifecycleState.START)) {
- entry.getValue().status.desiredState = LifecycleState.STOP;
- entry.getKey().stop();
- }
- }
- //3、更新本組件狀態
- if (lifecycleState.equals(LifecycleState.START)) {
- lifecycleState = LifecycleState.STOP;
- }
- //4、***的清理
- supervisedProcesses.clear();
- monitorFutures.clear();
接下來就是調用supervise進行組件守護了:
Java代碼
- if(this.monitorService.isShutdown() || this.monitorService.isTerminated()
- || this.monitorService.isTerminating()){
- //1、如果哨兵已停止則拋出異常,不再接收任何組件進行守護
- }
- //2、初始化守護組件
- Supervisoree process = new Supervisoree();
- process.status = new Status();
- //2.1、默認策略是失敗重啟
- process.policy = policy;
- //2.2、初始化組件默認狀態,大多數組件默認為START
- process.status.desiredState = desiredState;
- process.status.error = false;
- //3、組件監控器,用于定時獲取組件的***狀態,或者重新啟動組件
- MonitorRunnable monitorRunnable = new MonitorRunnable();
- monitorRunnable.lifecycleAware = lifecycleAware;
- monitorRunnable.supervisoree = process;
- monitorRunnable.monitorService = monitorService;
- supervisedProcesses.put(lifecycleAware, process);
- //4、定期的去執行組件監控器,獲取組件***狀態,或者重新啟動組件
- ScheduledFuture<?> future = monitorService.scheduleWithFixedDelay(
- monitorRunnable, 0, 3, TimeUnit.SECONDS);
- monitorFutures.put(lifecycleAware, future);
- }
如果不需要守護了,則需要調用unsupervise:
Java代碼
- public synchronized void unsupervise(LifecycleAware lifecycleAware) {
- synchronized (lifecycleAware) {
- Supervisoree supervisoree = supervisedProcesses.get(lifecycleAware);
- //1.1、設置守護組件的狀態為被丟棄
- supervisoree.status.discard = true;
- //1.2、設置組件盼望的***生命周期狀態為STOP
- this.setDesiredState(lifecycleAware, LifecycleState.STOP);
- //1.3、停止組件
- lifecycleAware.stop();
- }
- //2、從守護組件中移除
- supervisedProcesses.remove(lifecycleAware);
- //3、取消定時監控組件服務
- monitorFutures.get(lifecycleAware).cancel(false);
- //3.1、通知Purger需要進行清理,Purger會定期的移除cancel的組件
- needToPurge = true;
- monitorFutures.remove(lifecycleAware);
- }
接下來我們再看下MonitorRunnable的實現,其負責進行組件狀態遷移或組件故障恢復:
Java代碼
- public synchronized void unsupervise(LifecycleAware lifecycleAware) {
- synchronized (lifecycleAware) {
- Supervisoree supervisoree = supervisedProcesses.get(lifecycleAware);
- //1.1、設置守護組件的狀態為被丟棄
- supervisoree.status.discard = true;
- //1.2、設置組件盼望的***生命周期狀態為STOP
- this.setDesiredState(lifecycleAware, LifecycleState.STOP);
- //1.3、停止組件
- lifecycleAware.stop();
- }
- //2、從守護組件中移除
- supervisedProcesses.remove(lifecycleAware);
- //3、取消定時監控組件服務
- monitorFutures.get(lifecycleAware).cancel(false);
- //3.1、通知Purger需要進行清理,Purger會定期的移除cancel的組件
- needToPurge = true;
- monitorFutures.remove(lifecycleAware);
- }
- 接下來我們再看下MonitorRunnable的實現,其負責進行組件狀態遷移或組件故障恢復:
- Java代碼
- public void run() {
- long now = System.currentTimeMillis();
- try {
- if (supervisoree.status.firstSeen == null) {
- supervisoree.status.firstSeen = now; //1、記錄***次狀態查看時間
- }
- supervisoree.status.lastSeen = now; //2、記錄***一次狀態查看時間
- synchronized (lifecycleAware) {
- //3、如果守護組件被丟棄或出錯了,則直接返回
- if (supervisoree.status.discard || supervisoree.status.error) {
- return;
- }
- //4、更新***一次查看到的狀態
- supervisoree.status.lastSeenState = lifecycleAware.getLifecycleState();
- //5、如果組件的狀態和守護組件看到的狀態不一致,則以守護組件的狀態為準,然后進行初始化
- if (!lifecycleAware.getLifecycleState().equals(
- supervisoree.status.desiredState)) {
- switch (supervisoree.status.desiredState) {
- case START: //6、如果是啟動狀態,則啟動組件
- try {
- lifecycleAware.start();
- } catch (Throwable e) {
- if (e instanceof Error) {
- supervisoree.status.desiredState = LifecycleState.STOP;
- try {
- lifecycleAware.stop();
- } catch (Throwable e1) {
- supervisoree.status.error = true;
- if (e1 instanceof Error) {
- throw (Error) e1;
- }
- }
- }
- supervisoree.status.failures++;
- }
- break;
- case STOP: //7、如果是停止狀態,則停止組件
- try {
- lifecycleAware.stop();
- } catch (Throwable e) {
- if (e instanceof Error) {
- throw (Error) e;
- }
- supervisoree.status.failures++;
- }
- break;
- default:
- }
- } catch(Throwable t) {
- }
- }
- }
如上代碼進行了一些簡化,整體邏輯即定時去采集組件的狀態,如果發現守護組件和組件的狀態不一致,則可能需要進行啟動或停止。即守護監視器可以用來保證組件如能失敗后自動啟動。默認策略是總是失敗后重啟,還有一種策略是只啟動一次。
【本文是51CTO專欄作者張開濤的原創文章,作者微信公眾號:開濤的博客,id:kaitao-1234567】