如果構建自己的Python包
前言
在日常開發中,我們經常會把一些通用的函數、類或者模塊抽取出來,以便在不同的項目中復用。隨著代碼的積累,如何將這些工具封裝為一個標準的 Python 包(Python Package),并且方便團隊甚至社區使用,就成為一個值得思考的問題。本文將從零開始,介紹如何構建、打包和發布自己的 Python 包。
一、為什么要構建Phthon包?
1. 代碼復用:將常用的工具函數和邏輯沉淀為獨立模塊,避免復制粘貼。
2. 團隊協作:通過 PyPI 或內部源發布,團隊成員可以直接 pip install 使用。
3. 版本管理:獨立的包可以有清晰的版本迭代,不影響主項目。
4. 生態兼容:遵循 Python 社區標準,可以更好地融入現有生態。
二、單倉庫多模塊
在實際運維開發中,往往不僅僅是一個獨立的 Python 包,而是需要在**同一個倉庫(monorepo)** 中維護多個模塊(package)。這種模式能夠更好地統一管理依賴、版本以及 CI/CD 流程,適合團隊協作和多服務共存的場景。
三、目錄結構示例
├── MANIFEST.in
├── README.md
├── docs
├── exec.py
├── publish.sh
├── pyproject.toml
├── src
│   ├── pytbox
│   │   ├── __pycache__
│   │   ├── alert
│   │   ├── alicloud
│   │   ├── base.py
│   │   ├── categraf
│   │   ├── cli
│   │   ├── cli.py
│   │   ├── common
│   │   ├── database
│   │   ├── dida365.py
│   │   ├── feishu
│   │   ├── log
│   │   ├── onepassword_connect.py
│   │   ├── onepassword_sa.py
│   │   └── utils
│   └── pytbox.egg-info
│       ├── PKG-INFO
│       ├── SOURCES.txt
│       ├── dependency_links.txt
│       ├── entry_points.txt
│       ├── requires.txt
│       └── top_level.txt
└── tests
    ├── alert
    │   ├── __pycache__
    │   ├── config_dev.toml
    │   ├── test_ping.py
    │   └── test_traffic.py
    ├── categraf
    │   ├── conf
    │   └── instances.toml
    ├── conftest.py
    ├── test_base.py
    ├── test_feishu.py
    ├── test_logger.py
    ├── test_onepassword_connect.py
    ├── test_onepassword_sa.py
    ├── test_victoriametrics.py
    └── utils
        ├── __pycache__
        └── test_timeutils.py
29 directories, 38 files
四、開發環境搭建
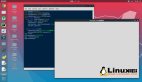
我使用的是 devcontainer 作為開發環境,可以用 VSCode 遠程到 Linux 并配置 devcontainer,可以解決環境本身,可以隨時更換 Python 版本,還能解決多人協作開發時,環境配置不一致的問題。
通過 VSCode 的 Remote SSH 登錄到一臺 Linux Server,需要先安裝 Docker 環境。
在項目根目錄下創建 .devcontainer 文件夾,并創建 devcontainer.json 文件,由于內容較長,可以在 github 中搜索 pytbox 項目,并參考我的配置。
Dockfile.dev 參考如下:
# 使用官方 Python 3.11 鏡像作為基礎鏡像
FROM python:3.11-slim
# 設置工作目錄
WORKDIR /app
ENV PYTHONPATH=/app/automation \
    TZ=Asia/Shanghai \
    PIP_DISABLE_PIP_VERSION_CHECK=1
# 修改為國內源
COPY debian.sources /etc/apt/sources.list.d/debian.sources
# 安裝系統依賴
RUN apt-get update && apt-get install -y \
    build-essential \
    curl \
    git \
    && rm -rf /var/lib/apt/lists/*
創建完成后可以 Shift + Command/Alt + P ,選擇 Dev Containers: Retbuild Container Without Cache 構建自己的開發環境,需要注意的是,下載鏡像時間會比較久,需要耐心等待。
五、準備 pyproject.toml 文件
yproject.toml 已經取代了過去的 setup.py,成為 構建與依賴管理的統一入口。對于單倉庫、多模塊項目,它不僅定義了整個倉庫的依賴,還能靈活指定每個子模塊的配置。
[build-system]
requires = ["setuptools>=61.0", "wheel"]
build-backend = "setuptools.build_meta"
[project]
name = "myproject"
version = "0.1.0"
description = "A monorepo Python project"
authors = [{ name = "YourName", email = "you@example.com" }]
license = { text = "MIT" }
readme = "README.md"
requires-python = ">=3.8"
dependencies = [
    "requests>=2.0"
]
[project.optional-dependencies]
dev = ["pytest", "black", "ruff"]
開發環境下安裝依賴可以執行 pip install .[dev] ,另外,如果模塊依賴其他的包,例如 requests ,推薦手動寫入到 dependencies 下。
六、命令行工具
如果有命令行工具的需求,也就是說用戶使用 pip install pytbox 后,希望執行 pytbox --help 使用命令行工具,可以按如下步驟操作。
在 pyproject.toml 下加入:
[project.scripts]
pytbox = "pytbox.cli:main" # 添加命令行入口點
在項目根目錄創建 exec.py 文件,作為入口。
#!/usr/bin/env python3
"""
開發環境可執行文件 - 支持新的模塊化 CLI
"""
import sys
from pathlib import Path
# 添加 src 目錄到 Python 路徑
src_path = Path(__file__).parent / 'src'
if src_path.exists():
    sys.path.insert(0, str(src_path))
from pytbox.cli import main
if __name__ == "__main__":
    main()
在 src/pytbox 下創建 cli.py。
#!/usr/bin/env python3
"""
Pytbox 命令行工具 - 入口文件(保持向后兼容)
"""
from pytbox.cli import main
if __name__ == "__main__":
    main()
然后在 src/pytbox/cli 目錄下創建 main.py。
#!/usr/bin/env python3
"""
Pytbox 主命令行入口
"""
import click
from .categraf import categraf_group
@click.group()
@click.version_option()
def main():
    """Pytbox 命令行工具集合"""
    pass
# 注冊子命令組
main.add_command(categraf_group, name='categraf')
if __name__ == "__main__":
    main()
在 src/pytbox/cli 目錄下就可以創建多個目錄,以實現各種這樣的功能,例如我創建的 src/pytbox/cli/categraf 用于生成 categraf 的配置。
示例文件 src/pytbox/cli/categraf/commands.py
"""
Categraf 相關命令 - 支持 rich 美化輸出
"""
import shutil
from pathlib import Path
import click
from ...utils.richutils import RichUtils
from ...categraf.build_config import BuildConfig
rich_utils = RichUtils()
@click.group()
def categraf_group():
    """Categraf 配置管理工具"""
    pass
@categraf_group.command('get-instances')
@click.option('--output-dir', '-o', type=click.Path(exists=True), default='.')
def get_instances(output_dir):
    """獲取 Categraf 實例配置"""
    instances_template_path = Path(__file__).parent.parent.parent / 'categraf' / 'instances.toml'
    dest_path = Path(output_dir) / 'instances.toml'
    shutil.copy(instances_template_path, dest_path)
    rich_utils.print(msg=f'已將 {instances_template_path} 復制到 {dest_path}', style='info')
七、手動發布到 Pypi
準備 PYPI 的 API Token,這一步需要在 pypi 官網上配置。
export TWINE_USERNAME="__token__"
export TWINE_PASSWORD="pypi-xxxxxxxxxxxxxxxx"
安裝依賴工具并發布。
pip install build twine
# 構建
python -m build
# 發布到 PYPI
twine upload dist/*
八、Github action 自動發布到 Pypi
強烈推薦使用 Action 自動發布,只要推送代碼到 Github 就可以自動完成后續的步驟。
1. 在.github/workflows 目錄下創建 publish.yml 文件。
2. 示例如下:
name: Publish to PyPI
on:
  push:
    tags: [ 'v*' ]
jobs:
  build:
    runs-on: ubuntu-latest
    steps:
      - uses: actions/checkout@v4
      - name: Set up Python
        uses: actions/setup-python@v5
        with:
          python-version: "3.11"
      - name: Install build tools
        run: pip install build twine
      - name: Build package
        run: python -m build
      - name: Publish to PyPI
        env:
          TWINE_USERNAME: __token__
          TWINE_PASSWORD: ${{ secrets.PYPI_API_TOKEN }}
        run: twine upload dist/*
3. 在倉庫中的 Settings -> Secrets and variables -> Actions -> Repository secrets 下創建 name 為 PYPI_API_TOKEN 的 secret。
4. 推薦使用 shell 腳本 push 到倉庫中,代碼有些長,可以在 pytbox 庫的根目錄下參考 publish.sh。
九、總結
在運維開發中,如果有多項目的需求,基本都是需要公共庫的,否則需要被多項目調用的模塊要重復編寫,復制到其他項目非常不方便,并且難以保證代碼質量,所以非常推薦編寫自己或團隊的公共代碼庫。