作者 | 崔皓
審校 | 重樓
開(kāi)篇
在日常 IT 運(yùn)營(yíng)場(chǎng)景里,EFK(Elasticsearch +Fluent Bit + Fluentd + Kibana )組合是日志管理與分析的經(jīng)典方案,被廣泛應(yīng)用于各類系統(tǒng)運(yùn)維中。它憑借 Fluent Bit 輕量高效的日志采集能力,快速獲取多源日志;依托 Fluentd 靈活的日志處理機(jī)制,完成過(guò)濾、格式化等操作;借由 Elasticsearch 強(qiáng)大的分布式存儲(chǔ)與檢索特性,實(shí)現(xiàn)日志的高效存儲(chǔ)和快速查詢;再通過(guò) Kibana 直觀的可視化界面,讓運(yùn)維人員能清晰洞察日志數(shù)據(jù)背后的系統(tǒng)狀態(tài),以 “采集 - 處理 - 存儲(chǔ) - 可視化” 的完整鏈路,助力運(yùn)維團(tuán)隊(duì)及時(shí)發(fā)現(xiàn)系統(tǒng)問(wèn)題,成為保障 IT 系統(tǒng)穩(wěn)定運(yùn)行的有力工具。
然而,在實(shí)際運(yùn)維過(guò)程中,面對(duì)日志里海量的錯(cuò)誤異常信息,僅靠傳統(tǒng) EFK 方案仍存在短板。IT 運(yùn)維人員受限于精力和時(shí)間,面對(duì)繁雜的異常日志,難以逐一對(duì)其深入拆解、分析根源,常常錯(cuò)過(guò)最佳修復(fù)時(shí)機(jī),導(dǎo)致小故障演變成影響業(yè)務(wù)的大問(wèn)題。為突破這一困境,我們嘗試引入 AI 運(yùn)維模式,借助 AI 大模型對(duì) EFK 采集到的異常信息進(jìn)行智能分析,讓機(jī)器替代人工完成繁瑣的異常診斷、根因定位等工作,以此提升運(yùn)維效率與質(zhì)量。
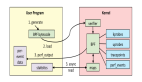
如下圖所示,本文將圍繞 EFK(Fluent Bit + Fluentd + Elasticsearch + Kibana)結(jié)合 AI 大模型的日志智能運(yùn)維方案展開(kāi)。先利用 Fluent Bit 從指定位置獲取日志,依解析規(guī)則處理后推送給 Fluentd;Fluentd 監(jiān)聽(tīng)日志,經(jīng)過(guò)濾器提取、解析并標(biāo)記異常,再輸出給 Elasticsearch 存儲(chǔ),同時(shí)調(diào)用大模型處理服務(wù);Elasticsearch 存儲(chǔ)的數(shù)據(jù)可在 Kibana 可視化展示;大模型處理服務(wù)則對(duì)異常日志解析、分析并生成報(bào)表。以 CPU 使用率異常場(chǎng)景為例,演示從日志采集、處理到智能診斷的全流程。
維方案:技術(shù)架構(gòu)與實(shí)施步驟-AI.x社區(qū)")
安裝環(huán)境
工欲善其事必先利其器,在開(kāi)始案例之前我們先把需要用到的應(yīng)用和環(huán)境安裝上,首先保證 docker 安裝完成,然后從文件夾到容器的安裝,按照如下流程進(jìn)行。
創(chuàng)建文件夾
準(zhǔn)備好 fluent-bit、fluentd 以及 web-logs 文件夾。分別用來(lái)放置容器的配置文件和對(duì)應(yīng)的日志文件。
請(qǐng)注意,我這里以/Users/cuihao/docker 為基礎(chǔ)目錄, 在這個(gè)目錄下創(chuàng)建文件夾和文件,大家可以按照自己的操作系統(tǒng)和目錄情況規(guī)劃目錄以及存放文件。
如下圖所示, 我們可以看到 fluent-bit、fluentd 以及 weblogs 三個(gè)目錄。稍后我們會(huì)分別在這三個(gè)目錄下面放置對(duì)應(yīng)應(yīng)用的配置文件,用來(lái)完成日志采集、分析、過(guò)濾、輸出等操作。
維方案:技術(shù)架構(gòu)與實(shí)施步驟-AI.x社區(qū)")
在完成文件夾的創(chuàng)建之后,接著在 fluent-bit 文件夾下創(chuàng)建 etc 目錄,后面會(huì)在 etc 下面創(chuàng)建 fluent-bit.conf 文件,用來(lái)配置日志采集的輸入和輸出信息。
維方案:技術(shù)架構(gòu)與實(shí)施步驟-AI.x社區(qū)")
完成 fluent-bit 文件夾創(chuàng)建之后,接著在 fluentd 文件夾下面創(chuàng)建 conf 文件夾,為 fluent.conf 的創(chuàng)建做好準(zhǔn)備。這里可以劇透一下,在fluent.conf 會(huì)有日志采集、過(guò)濾、標(biāo)記、調(diào)用智能報(bào)表等配置信息。
維方案:技術(shù)架構(gòu)與實(shí)施步驟-AI.x社區(qū)")
最后,就是保證創(chuàng)建一個(gè) web-logs 目錄,下面的 metric_log 文件是我們用來(lái)模擬 CPU 使用率數(shù)據(jù)的日志文件。也是案例的起點(diǎn), fluent-bit 會(huì)從這里采集數(shù)據(jù)。
維方案:技術(shù)架構(gòu)與實(shí)施步驟-AI.x社區(qū)")
創(chuàng)建 FluentD Docker 文件
完成目錄布局之后,我們大致知道完成案例大致需要的配置信息,接著在目錄/Users/cuihao/docker/EFK/fluentd/ 下創(chuàng)建 Dockerfile 文件。這個(gè)文件用來(lái)安裝 fluentd 的基礎(chǔ)鏡像以及對(duì)應(yīng)的插件。
# 使用的基礎(chǔ)鏡像
 FROM fluent/fluentd:edge-debian
 # 切換用戶為root方便接下來(lái)執(zhí)行安裝命令
 USER root
 # 安裝系統(tǒng)依賴
 RUN apt-get update && \
 apt-get install -y curl && \
 rm -rf /var/lib/apt/lists/*

 # 卸載可能存在的高版本 Elasticsearch gem
 RUN gem uninstall elasticsearch elasticsearch-api -a -x || true

 # 安裝指定版本 gem 和 Fluentd Elasticsearch 插件
 RUN gem install elasticsearch -v 8.17.1 --no-document && \
 gem install elasticsearch-api -v 8.17.1 --no-document && \
 gem install fluent-plugin-elasticsearch -v 5.4.3 --no-document
 USER fluent
上述 Dockerfile 文件以官方 fluentd 的 edge-debian 版本,在這個(gè)版本的基礎(chǔ)上 fluentd 還需要配置數(shù)據(jù)轉(zhuǎn)發(fā)或聚合操作,比如本例中需要轉(zhuǎn)發(fā)到ES,就需要安裝對(duì)應(yīng)的插件(fluent-plugin-elasticsearch)。這些插件就需要通過(guò) Dockerfile 文件的方式安裝。
從文件中可以看到,首先切換到 root 用戶安裝系統(tǒng)依賴 curl,再清理可能存在的高版本 Elasticsearch 相關(guān)組件,隨后安裝 8.17.1 版本的 elasticsearch(注意這里使用的 ES 版本)、elasticsearch-api gem 包及 5.4.3 版本的 fluent-plugin-elasticsearch 插件,確保與目標(biāo) Elasticsearch 服務(wù)兼容,最后切換回 fluent 普通用戶以遵循最小權(quán)限原則,最終生成一個(gè)可直接用于 EFK 日志棧中收集并向 Elasticsearch 發(fā)送日志的定制化鏡像。
創(chuàng)建 EFK 組件docker-compose 文件
由于本案例需要安裝 fluent-bit、fluentd、elasticsearch、kibana 等應(yīng)用,為了方便安裝與調(diào)試,我們計(jì)劃使用 docker 方式對(duì)他們進(jìn)行安裝。于是 docker compose 的安裝方式就成了最佳選擇,它可以用于定義和管理多容器 Docker 應(yīng)用的 YAML 配置文件,能將多個(gè)關(guān)聯(lián)的容器(如應(yīng)用服務(wù)、數(shù)據(jù)庫(kù)、緩存等)的配置(鏡像、端口映射、數(shù)據(jù)卷、環(huán)境變量、依賴關(guān)系等)集中整合,通過(guò) docker compose 命令一鍵實(shí)現(xiàn)多容器的創(chuàng)建、啟動(dòng)、停止、重啟等操作。其核心益處在于簡(jiǎn)化了多容器應(yīng)用的部署與管理流程,避免了手動(dòng)逐個(gè)操作容器的繁瑣;通過(guò)統(tǒng)一配置文件確保了環(huán)境一致性,同時(shí)清晰的依賴關(guān)系定義保證了容器按正確順序啟動(dòng)。
為了保證安裝的順利進(jìn)行我們選擇Fluentd官網(wǎng)的docker-compose 文件,并在其基礎(chǔ)上進(jìn)行修改,從而適應(yīng)安裝需求。
由于該文件內(nèi)容比較長(zhǎng),這里我們通過(guò)一張大圖將文件的內(nèi)容進(jìn)行描述,如下:
維方案:技術(shù)架構(gòu)與實(shí)施步驟-AI.x社區(qū)")
該文件用于搭建 EFK(Fluent Bit + Fluentd + Elasticsearch + Kibana)日志管理系統(tǒng)。通過(guò)定義 fluent-bit(輕量采集容器日志,依賴 fluentd 健康后啟動(dòng),配置掛載日志目錄與配置文件)、fluentd(基于自定義 Dockerfile 構(gòu)建,格式化日志,依賴 elasticsearch 健康后啟動(dòng),配置掛載、端口及健康檢查 )、elasticsearch(存儲(chǔ)日志,單節(jié)點(diǎn)模式、關(guān)閉安全功能,配置健康檢查與端口 )、kibana(可視化日志,依賴 elasticsearch 健康后啟動(dòng),映射 Web 端口 )四個(gè)服務(wù),利用 Docker Compose 實(shí)現(xiàn)多容器協(xié)同,讓日志從采集、處理、存儲(chǔ)到可視化全流程自動(dòng)化部署與管理,各服務(wù)間通過(guò)健康檢查依賴保障啟動(dòng)順序與運(yùn)行狀態(tài),方便快速搭建日志分析環(huán)境。
文件內(nèi)容如下:
# 定義本文件中所有要啟動(dòng)的服務(wù)(容器)
 services:
 # Fluent Bit:輕量收集容器日志
 # 【服務(wù)名】是的,'fluent-bit' 就是這個(gè)服務(wù)的名稱。它在 Docker Compose 網(wǎng)絡(luò)內(nèi)部被識(shí)別為此名。
 fluent-bit:
 # 使用的鏡像:從 Docker Hub 拉取最新的 Fluent Bit 官方鏡像
 image: fluent/fluent-bit:latest
 # 指定容器啟動(dòng)后的名稱,通過(guò) `docker ps` 等命令可以看到這個(gè)名字
 container_name: fluent-bit
 # 依賴關(guān)系:指定此服務(wù)的啟動(dòng)依賴于另一個(gè)服務(wù) 'fluentd'
 depends_on:
 fluentd:
 # 條件:只有當(dāng) 'fluentd' 服務(wù)通過(guò)健康檢查(healthy)后,才會(huì)啟動(dòng) fluent-bit
 condition: service_healthy
 # 端口映射:將宿主機(jī)的端口映射到容器內(nèi)的端口
 # 格式 - "宿主機(jī)端口:容器端口"
 ports:
 - "2020:2020" # 將容器內(nèi)的 2020 端口(Fluent Bit 的 HTTP Server,常用于健康檢查或監(jiān)控)映射到宿主機(jī)的 2020 端口
 # 數(shù)據(jù)卷掛載:將宿主機(jī)的目錄或文件掛載到容器內(nèi),實(shí)現(xiàn)數(shù)據(jù)持久化或配置注入
 volumes:
 # 將宿主機(jī)的 '/Users/cuihao/docker/EFK/web-logs' 目錄掛載到容器內(nèi)的 '/var/log/' 目錄。
 # Fluent Bit 會(huì)監(jiān)控這個(gè)目錄下的日志文件變化,并收集新產(chǎn)生的日志。
 #/var/log/metric_log
 #/Users/cuihao/docker/EFK/web-logs
 - /Users/cuihao/docker/EFK/web-logs:/var/log/
 # 將宿主機(jī)的 Fluent Bit 主配置文件掛載到容器內(nèi),替代鏡像內(nèi)的默認(rèn)配置。
 # 這個(gè)文件定義了數(shù)據(jù)輸入(Input)、處理(Parser, Filter)和輸出(Output)的規(guī)則。
 - /Users/cuihao/docker/EFK/fluent-bit/etc/:/fluent-bit/etc/

 # Fluentd:格式化
 # 【服務(wù)名】'fluentd' 是這個(gè)服務(wù)的名稱。
 fluentd:
 container_name: fluent
 # 不是使用現(xiàn)成的鏡像,而是通過(guò)指定構(gòu)建上下文路徑(E:\EFK\fluentd)來(lái)構(gòu)建自定義鏡像。
 # 該路徑下應(yīng)該有一個(gè)名為 'Dockerfile' 的文件,默認(rèn)讀取 'Dockerfile' 文件。
 build: /Users/cuihao/docker/EFK/fluentd
 volumes:
 # 將宿主機(jī)上的 Fluentd 配置目錄掛載到容器內(nèi),使配置變更無(wú)需重新構(gòu)建鏡像。
 - /Users/cuihao/docker/EFK/fluentd/conf:/fluentd/etc
 depends_on:
 elasticsearch:
 condition: service_healthy
 ports:
 - "24224:24224" # Fluentd 默認(rèn)的 TCP 端口,用于接收來(lái)自 Fluent Bit 或其他客戶端轉(zhuǎn)發(fā)來(lái)的日志,這個(gè)端口會(huì)配置到fluent-bit的OUTPUT中
 - "24224:24224/udp" # Fluentd 默認(rèn)的 UDP 端口,用途同上
 - "24220:24220" # Fluentd 的健康檢查 API 端口
 # 健康檢查配置:Docker 會(huì)根據(jù)此規(guī)則判斷容器是否正常啟動(dòng)
 healthcheck:
 test: ["CMD-SHELL", "curl -fs http://localhost:24220/api/plugins.json || exit 1"] # 檢查健康檢查端點(diǎn)是否返回成功
 interval: 5s # 每 5 秒檢查一次
 timeout: 3s # 每次檢查超時(shí)時(shí)間為 3 秒
 retries: 5 # 連續(xù)失敗 5 次才標(biāo)記為不健康
 start_period: 10s # 容器啟動(dòng)后,等待 10 秒再進(jìn)行第一次健康檢查

 # Elasticsearch:存儲(chǔ)日志
 # 【服務(wù)名】'elasticsearch' 是這個(gè)服務(wù)的名稱。
 elasticsearch:
 image: docker.elastic.co/elasticsearch/elasticsearch:8.17.1 # 使用 Elastic 官方的 8.17.1 版本鏡像
 container_name: elasticsearch
 hostname: elasticsearch # 設(shè)置容器內(nèi)部的主機(jī)名,在集群中很有用
 environment:
 - discovery.type=single-node # 設(shè)置為單節(jié)點(diǎn)模式,適合開(kāi)發(fā)和測(cè)試
 - xpack.security.enabled=false # 關(guān)閉 X-Pack 安全功能(用戶認(rèn)證、HTTPS等)。生產(chǎn)環(huán)境必須開(kāi)啟,但測(cè)試時(shí)關(guān)閉更簡(jiǎn)單。
 healthcheck:
 test: ["CMD", "curl", "-f", "http://localhost:9200/_cluster/health"] # 檢查 ES 集群健康狀態(tài) API
 interval: 10s
 retries: 5
 timeout: 5s
 ports:
 - "9200:9200" # 將 ES 的 HTTP REST API 端口映射到宿主機(jī),方便通過(guò)瀏覽器或命令訪問(wèn)

 # Kibana:日志可視化
 # 【服務(wù)名】'kibana' 是這個(gè)服務(wù)的名稱。
 kibana:
 container_name: kibana
 image: docker.elastic.co/kibana/kibana:8.17.1 # Kibana 版本需要與 Elasticsearch 版本一致
 depends_on:
 elasticsearch:
 condition: service_healthy # 等待 Elasticsearch 健康后再啟動(dòng)
 ports:
 - "5601:5601" # 將 Kibana 的 Web 界面端口映射到宿主機(jī),通過(guò) http://localhost:5601 訪問(wèn)
啟動(dòng) EFK 組件
有了前面的準(zhǔn)備, EFK 都通過(guò) Docker 鏡像的方式進(jìn)行了定義,接著只需要執(zhí)行 docker compose 命令就可以安裝了。
執(zhí)行如下命令啟動(dòng)容器安裝 EFK 組件:
docker compose -f /Users/cuihao/docker/EFK/docker-compose.yml up -d如果出現(xiàn)如下錯(cuò)誤:
=> ERROR [fluentd internal] load metadata for docker.io/fluent/fluentd:edge-debian 31.1s
 ------
 > [fluentd internal] load metadata for docker.io/fluent/fluentd:edge-debian:
 ------
 failed to solve: DeadlineExceeded: DeadlineExceeded: DeadlineExceeded: fluent/fluentd:edge-debian: failed to resolve source metadata for docker.io/fluent/fluentd:edge-debian: failed to authorize: DeadlineExceeded: failed to fetch anonymous token: Get "https://auth.docker.io/token?scope=repository%3Afluent%2Ffluentd%3Apull&service=registry.docker.io": dial tcp 75.126.124.162:443: i/o timeout
說(shuō)明需要手動(dòng)拉取 fluentd 的鏡像,執(zhí)行如下命令:
docker pull fluent/fluentd:edge-debian再次執(zhí)行如下命令:
docker compose -f /Users/cuihao/docker/EFK/docker-compose.yml up -d完成安裝之后,可以通過(guò) docker desktop 看到容器服務(wù)正常運(yùn)行。如下圖所示,
維方案:技術(shù)架構(gòu)與實(shí)施步驟-AI.x社區(qū)")
配置日志采集與分析
完成 EFK 的安裝之后,接下來(lái)就開(kāi)始應(yīng)用之間的配置了。在配置之前,我們先回顧一下案例的整體思路,fluent-bit 是日志采集的第一步,它會(huì)從日志文件中采集日志的信息,這里需要定義日志目錄。如圖所示,綠色區(qū)域中我們需要配置“日志目錄”,同時(shí)還需要制定fluent-bit 采集之后需要將日志信息輸出到 fluentd 中,這里需要填入“fluentd”作為輸出的服務(wù)名。
維方案:技術(shù)架構(gòu)與實(shí)施步驟-AI.x社區(qū)")
配置 Fluent Bit
從上面的描述,我們清楚需要對(duì) fluent-bit 的輸入和輸出進(jìn)行配置,接下來(lái)就是編寫(xiě)配置文件了。在/Users/cuihao/docker/EFK/fluent-bit/etc 創(chuàng)建 fluent-bit.conf 文件如下:
##############################################
 # 輸入插件配置(收集日志)
 ##############################################

 # 輸入源1:采集cpu日志文件
 [INPUT]
 # 使用 tail 插件監(jiān)控文件變化
 Name tail
 # 自定義標(biāo)簽,標(biāo)識(shí)為系統(tǒng)指標(biāo)類日志
 Tag sys.metric
 # 系統(tǒng)指標(biāo)日志文件路徑(可能是由其他工具生成的指標(biāo)數(shù)據(jù))
 Path /var/log/metric_log
 # 檢查文件變化的間隔時(shí)間(秒)
 Refresh_Interval 10

 ##############################################
 # 輸出插件(轉(zhuǎn)發(fā)到 Fluentd)
 ##############################################
 [OUTPUT]
 # 使用 forward 插件將日志轉(zhuǎn)發(fā)到Fluentd聚合器
 Name forward
 # 匹配所有標(biāo)簽的日志(* 是通配符,表示所有輸入源)
 Match *
 # Fluentd 服務(wù)地址(使用Docker Compose服務(wù)名進(jìn)行服務(wù)發(fā)現(xiàn))
 Host fluentd
 # Fluentd 監(jiān)聽(tīng)端口(forward插件的默認(rèn)端口)
 Port 24224
 # 網(wǎng)絡(luò)故障時(shí)的最大重試次數(shù),防止無(wú)限重試消耗資源
 Retry_Limit 10

 # 輸出源2:同時(shí)輸出到控制臺(tái)(用于調(diào)試和監(jiān)控)
 [OUTPUT]
 # 使用 stdout 插件在控制臺(tái)打印日志
 Name stdout
 # 匹配所有標(biāo)簽的日志
 Match *
 # 注意:生產(chǎn)環(huán)境通常應(yīng)注釋或移除此輸出,避免日志重復(fù)和性能開(kāi)銷
由于文件中的配置信息都用了備注,比較容易理解就不逐一解釋了。需要注意的是配置文件中的 Host 對(duì)應(yīng)的 fluentd 是 docker 容器的服務(wù)名,由于這幾個(gè)應(yīng)用是通過(guò) docker compose 安裝的能夠保證在相同的網(wǎng)絡(luò)內(nèi),所以可以通過(guò)服務(wù)名進(jìn)行訪問(wèn),通過(guò)下圖的方式查詢。
維方案:技術(shù)架構(gòu)與實(shí)施步驟-AI.x社區(qū)")
維方案:技術(shù)架構(gòu)與實(shí)施步驟-AI.x社區(qū)")
配置 Fluentd
完成 fluent bit 的配置之后,緊接著就需要對(duì) fluentd 進(jìn)行配置了,它是整個(gè)配置環(huán)節(jié)的重頭戲,這里還是以案例整體大圖為例。將 fluentd 的部分進(jìn)行展開(kāi)說(shuō)明, 如下圖所示。Fluent Bit 從日志文件獲取日志并推送給 Fluentd,F(xiàn)luentd 經(jīng) 24224 端口監(jiān)聽(tīng)接收。先由過(guò)濾器按規(guī)則提取日志(過(guò)濾指定 Tag、正則提取 JSON )、解析日志(自定義 JSON 解析器處理原始日志),若 CPU 使用率超 80% 則標(biāo)記異常;接著通過(guò)多路輸出,將日志存至 Elasticsearch、輸出到控制臺(tái),還會(huì)對(duì)標(biāo)記異常的日志,調(diào)用大模型處理服務(wù)(process_log.py )進(jìn)一步分析。
維方案:技術(shù)架構(gòu)與實(shí)施步驟-AI.x社區(qū)")
在/Users/cuihao/docker/EFK/fluentd/conf 目錄下創(chuàng)建 fluent.conf 文件,內(nèi)容如下:
###############################
 # Fluentd 健康檢查(monitor_agent)
 ###############################
 <source>
 @type monitor_agent # 啟用監(jiān)控代理插件,用于收集Fluentd自身運(yùn)行指標(biāo)
 bind 0.0.0.0 # 監(jiān)聽(tīng)所有網(wǎng)絡(luò)接口
 port 24220 # 監(jiān)控服務(wù)端口,可通過(guò)此端口獲取Fluentd運(yùn)行狀態(tài)信息
 </source>

 ###############################
 # Fluentd 日志輸入(forward)
 ###############################
 <source>
 @type forward # 啟用forward輸入插件,接收來(lái)自Fluent-bit或其他Fluentd節(jié)點(diǎn)的日志
 port 24224 # 轉(zhuǎn)發(fā)協(xié)議監(jiān)聽(tīng)端口
 bind 0.0.0.0 # 監(jiān)聽(tīng)所有網(wǎng)絡(luò)接口
 </source>

 ###############################
 # 處理 collectd 采集的CPU指標(biāo)數(shù)據(jù)
 ###############################
 # 第一步:提取log字段中write_log后的JSON部分(現(xiàn)有配置)
 <filter sys.metric> # 過(guò)濾系統(tǒng)指標(biāo)數(shù)據(jù)
 @type parser # 使用解析器插件
 key_name log # 解析log字段內(nèi)容
 reserve_data true # 保留所有原始字段
 remove_key_name_field false # 不移除原始的key_name字段
 <parse>
 @type regexp # 使用正則表達(dá)式解析
 # 正則表達(dá)式匹配collectd的CPU數(shù)據(jù)格式,使用命名捕獲組提取CPU信息
 expression /write_log values:(?:#012|\s)*(?<log>\[\{.*?\}\])/ # 非貪婪匹配確保只取一個(gè)數(shù)組

 time_key time # 指定時(shí)間字段
 time_type float # 時(shí)間格式為浮點(diǎn)數(shù)(Unix時(shí)間戳)
 </parse>
 </filter>

 # 第二步:將log字段的JSON字符串解析為JSON對(duì)象
 <filter sys.metric>
 @type parser
 key_name log # 解析第一步提取的log字段(此時(shí)是JSON字符串)
 reserve_data true # 保留所有字段
 remove_key_name_field false # 保留解析后的log字段
 <parse>
 @type json # 用JSON解析器處理
 json_parser json # 使用默認(rèn)JSON解析器
 array true # 強(qiáng)制將JSON數(shù)組字符串解析為數(shù)組對(duì)象
 </parse>
 </filter>

 # 第三步:標(biāo)記異常日志(增加詳細(xì)調(diào)試字段)
 <filter sys.metric>
 @type record_transformer
 enable_ruby true
 <record>
 # 直接判斷 values[0] 是否大于 80
 status ${(record["plugin"] == "cpu" && record["type"] == "percent" && record["values"].is_a?(Array) && !record["values"].empty? && record["values"][0].to_f > 80) ? "abnormal" : "normal"}

 debug_plugin ${record["plugin"].to_s}
 debug_type ${record["type"].to_s}
 debug_values_content ${record["values"].inspect}
 </record>
 </filter>

 ###############################
 # 輸出到 Elasticsearch 8、stdout 和 HTTP端點(diǎn)
 ###############################
 <match *.**> # 匹配所有標(biāo)簽的日志Tag
 @type copy # 復(fù)制插件,將日志同時(shí)發(fā)送到多個(gè)輸出目的地

 # 第一個(gè)輸出目標(biāo):Elasticsearch
 <store>
 @id es_output
 @type elasticsearch # 輸出到Elasticsearch
 host elasticsearch # ES主機(jī)地址(可以是主機(jī)名或IP)
 port 9200 # ES服務(wù)端口
 scheme http # 使用HTTP協(xié)議
 logstash_format true # 使用Logstash格式索引命名
 logstash_prefix fluentd-${tag} # 索引前綴加上標(biāo)簽名
 logstash_dateformat %Y%m%d # 索引日期格式年月日
 include_tag_key true # 在輸出中包含標(biāo)簽字段
 tag_key @log_name # 標(biāo)簽字段的鍵名
 flush_interval 1s # 刷新間隔1秒
 </store>

 <store>
 @id output
 @type stdout # 輸出到控制臺(tái)/stdout
 key status # 字段
 pattern ^normal$ # 正則匹配
 </store>

 <store>
 @type relabel # 使用 relabel 輸出插件進(jìn)行標(biāo)簽重路由
 @label @abnormal # 將所有匹配到的數(shù)據(jù)重新路由到 @abnormal 標(biāo)簽處理流程
 </store>
 </match>


 ###############################
 # 異常日志輸出到 HTTP端點(diǎn)
 ###############################
 <label @abnormal>
 # 這個(gè) filter 塊會(huì)對(duì)所有進(jìn)入 @abnormal 標(biāo)簽的數(shù)據(jù)進(jìn)行過(guò)濾
 # 只有通過(guò)這個(gè)過(guò)濾器的數(shù)據(jù)才會(huì)繼續(xù)流向后面的 match 塊
 <filter **>
 @type grep # 使用 grep 過(guò)濾器
 <regexp>
 key status # 檢查每條記錄的 status 字段
 pattern ^abnormal$ # 只保留 status 值為 "abnormal" 的記錄
 </regexp>
 </filter>

 # 這個(gè) match 塊會(huì)接收到經(jīng)過(guò)上面 filter 過(guò)濾后的數(shù)據(jù)
 <match **>
 @id http_output
 @type http # HTTP輸出插件
 endpoint http://host.docker.internal:5001/analyze-fluentd-log # 日志分析API端點(diǎn),host.docker.internal是Docker特殊主機(jī)名,指向宿主機(jī)
 http_method post # 使用POST方法發(fā)送

 <format>
 @type json # 數(shù)據(jù)格式為JSON
 </format>

 <buffer>
 # 緩沖配置區(qū)塊:控制數(shù)據(jù)如何緩沖和重試發(fā)送
 # 用于提高網(wǎng)絡(luò)輸出的可靠性和性能,避免頻繁的小數(shù)據(jù)包發(fā)送

 # 緩沖刷新間隔:每2秒強(qiáng)制刷新一次緩沖區(qū)
 # - 即使緩沖區(qū)未滿,也會(huì)每2秒發(fā)送一次累積的數(shù)據(jù)
 # - 平衡實(shí)時(shí)性和網(wǎng)絡(luò)效率:太短會(huì)增加網(wǎng)絡(luò)請(qǐng)求,太長(zhǎng)會(huì)降低實(shí)時(shí)性
 flush_interval 2s

 # 重試策略:使用指數(shù)退避算法
 # - 第一次重試等待:基礎(chǔ)等待時(shí)間
 # - 第二次重試等待:基礎(chǔ)時(shí)間 × 2
 # - 第三次重試等待:基礎(chǔ)時(shí)間 × 4,依此類推
 # - 避免網(wǎng)絡(luò)擁塞時(shí)的大量重試導(dǎo)致雪崩效應(yīng)
 retry_type exponential_backoff

 # 基礎(chǔ)重試等待時(shí)間:第一次重試前等待1秒
 # - 首次重試的初始等待間隔
 # - 后續(xù)重試會(huì)根據(jù)指數(shù)退避算法遞增
 retry_wait 1s

 # 最大重試間隔:?jiǎn)未沃卦囎疃嗟却?0秒
 # - 防止指數(shù)增長(zhǎng)后的等待時(shí)間過(guò)長(zhǎng)
 # - 即使使用指數(shù)退避,也不會(huì)超過(guò)30秒的間隔
 retry_max_interval 30s

 # 總重試超時(shí)時(shí)間:10分鐘后放棄重試
 # - 從第一次失敗開(kāi)始計(jì)算,10分鐘后停止重試
 # - 防止因?yàn)殚L(zhǎng)期不可用的目標(biāo)服務(wù)導(dǎo)致無(wú)限重試
 # - 超時(shí)后數(shù)據(jù)可能會(huì)被丟棄(取決于配置)
 retry_timeout 10m
 </buffer>
 </match>
 </label>
生成智能報(bào)表
在完成配置 fluent bit 與 fluentd 的配置之后,我們來(lái)到生成智能報(bào)表的環(huán)節(jié), 這里需要根據(jù) fluentd 傳入的告警信息(CPU 使用率>80%),進(jìn)行分析并生成報(bào)表。
在/Users/cuihao/docker/EFK/目錄下創(chuàng)建process_log.py 文件, 寫(xiě)入如下內(nèi)容:
from flask import Flask, request, jsonify, Response
 from openai import AsyncOpenAI
 import os
 import json
 import threading
 import asyncio
 from datetime import datetime
 from dotenv import load_dotenv

 # 加載環(huán)境變量
 load_dotenv()

 # 創(chuàng)建Flask應(yīng)用實(shí)例
 app = Flask(__name__)

 # 初始化客戶端
 DEEPSEEK_API_KEY = os.getenv("DEEPSEEK_API_KEY")
 if not DEEPSEEK_API_KEY:
 raise ValueError("未找到DEEPSEEK_API_KEY,請(qǐng)?jiān)?env文件中配置")

 client = AsyncOpenAI(
 api_key=DEEPSEEK_API_KEY,
 base_url="https://api.deepseek.com"
 )

 # 路徑配置
 current_dir = os.path.dirname(os.path.abspath(__file__))
 report_dir = os.path.join(current_dir, "report")
 OUTPUT_REPORT_PATH = os.path.join(report_dir, "incident_report.json")
 ERROR_INFO_PATH = os.path.join(current_dir, "api_error.log")
 OPERATION_LOG_PATH = os.path.join(current_dir, "api_operation.log") # 新增操作日志文件
 os.makedirs(report_dir, exist_ok=True)


 def write_operation_log(message, request_id=None):
 """記錄操作日志,包含時(shí)間戳和可選的請(qǐng)求ID"""
 timestamp = datetime.now().strftime("%Y-%m-%d %H:%M:%S.%f")[:-3] # 精確到毫秒
 request_id = request_id or "N/A"
 log_entry = f"[{timestamp}] [REQUEST={request_id}] OPERATION: {message}\n"
 try:
 with open(OPERATION_LOG_PATH, 'a', encoding='utf-8') as f:
 f.write(log_entry)
 print(log_entry.strip()) # 同時(shí)輸出到控制臺(tái)
 except Exception as e:
 print(f"[日志系統(tǒng)錯(cuò)誤] 寫(xiě)入操作日志失敗: {str(e)} | 原始消息: {message}")


 def write_error_log(error_message, request_id=None):
 """記錄錯(cuò)誤日志,包含時(shí)間戳和請(qǐng)求ID"""
 timestamp = datetime.now().strftime("%Y-%m-%d %H:%M:%S.%f")[:-3]
 request_id = request_id or "N/A"
 log_entry = f"[{timestamp}] [REQUEST={request_id}] ERROR: {error_message}\n"
 try:
 with open(ERROR_INFO_PATH, 'a', encoding='utf-8') as f:
 f.write(log_entry)
 print(log_entry.strip()) # 同時(shí)輸出到控制臺(tái)
 except Exception as e:
 print(f"[日志系統(tǒng)錯(cuò)誤] 寫(xiě)入錯(cuò)誤日志失敗: {str(e)} | 原始錯(cuò)誤: {error_message}")


 def append_to_json_file(data, timestamp, request_id):
 """將數(shù)據(jù)追加到JSON文件,帶日志記錄"""
 try:
 write_operation_log("開(kāi)始寫(xiě)入分析報(bào)告", request_id)

 data_with_timestamp = {
 "timestamp": timestamp,
 "request_id": request_id, # 新增請(qǐng)求ID便于追蹤
 **data
 }

 existing_data = []
 if os.path.exists(OUTPUT_REPORT_PATH):
 try:
 with open(OUTPUT_REPORT_PATH, 'r', encoding='utf-8') as f:
 existing_data = json.load(f)
 write_operation_log(f"成功讀取現(xiàn)有報(bào)告({len(existing_data)}條記錄)", request_id)
 except (json.JSONDecodeError, FileNotFoundError):
 error_msg = "報(bào)告文件損壞或不存在,將重新初始化"
 write_error_log(error_msg, request_id)
 existing_data = []

 existing_data.append(data_with_timestamp)

 with open(OUTPUT_REPORT_PATH, 'w', encoding='utf-8') as f:
 json.dump(existing_data, f, ensure_ascii=False, indent=2)

 write_operation_log("分析報(bào)告寫(xiě)入成功", request_id)
 return True
 except Exception as e:
 error_msg = f"寫(xiě)入JSON報(bào)告文件時(shí)出錯(cuò): {str(e)}"
 write_error_log(error_msg, request_id)
 return False


 async def process_llm_background(log_content, call_timestamp, request_id):
 """后臺(tái)處理LLM調(diào)用,帶詳細(xì)日志"""
 try:
 write_operation_log("開(kāi)始后臺(tái)LLM處理流程", request_id)

 # 構(gòu)造提示詞
 write_operation_log("開(kāi)始構(gòu)建提示詞", request_id)
 prompt = f"""
 你是一名系統(tǒng)運(yùn)維專家。以下是異常日志,請(qǐng)生成根因分析報(bào)告:
 日志內(nèi)容:
 {log_content}

 請(qǐng)輸出格式:
 【標(biāo)題】
 ...
 【異常原因分析】
 ...
 【修復(fù)建議】
 ...
 """
 write_operation_log("提示詞構(gòu)建完成,準(zhǔn)備調(diào)用LLM", request_id)

 # 調(diào)用LLM
 write_operation_log("開(kāi)始調(diào)用DeepSeek API", request_id)
 response = await client.chat.completions.create(
 model="deepseek-chat",
 messages=[
 {"role": "system", "content": "你是經(jīng)驗(yàn)豐富的運(yùn)維專家,負(fù)責(zé)分析日志并提供修復(fù)建議"},
 {"role": "user", "content": prompt}
 ],
 temperature=0.7,
 max_tokens=800,
 stream=False
 )
 write_operation_log("DeepSeek API調(diào)用成功", request_id)

 # 處理結(jié)果
 report_text = response.choices[0].message.content
 result_data = {
 "raw_log": log_content,
 "root_cause_report": report_text
 }
 write_operation_log("LLM返回結(jié)果解析完成", request_id)

 # 保存結(jié)果
 if append_to_json_file(result_data, call_timestamp, request_id):
 write_operation_log("分析結(jié)果已成功保存到報(bào)告文件", request_id)
 else:
 write_error_log("分析結(jié)果保存失敗", request_id)

 write_operation_log("后臺(tái)LLM處理流程完成", request_id)

 except Exception as e:
 error_msg = f"LLM調(diào)用失敗: {str(e)}"
 write_error_log(error_msg, request_id)


 def run_async_task(log_content, call_timestamp, request_id):
 """線程包裝器,帶日志"""
 try:
 write_operation_log("啟動(dòng)異步任務(wù)處理線程", request_id)
 asyncio.run(process_llm_background(log_content, call_timestamp, request_id))
 except Exception as e:
 write_error_log(f"異步任務(wù)線程執(zhí)行失敗: {str(e)}", request_id)


 def build_log_content_from_records(records, request_id):
 """構(gòu)建日志內(nèi)容,帶日志記錄"""
 write_operation_log("開(kāi)始構(gòu)建日志內(nèi)容", request_id)
 lines = []
 for i, record in enumerate(records or []):
 if isinstance(record, dict) and ("log" in record):
 value = record.get("log")
 if value is not None and str(value).strip() != "":
 lines.append(str(value))
 write_operation_log(f"成功提取第{i+1}條記錄的log字段", request_id)
 else:
 write_operation_log(f"第{i+1}條記錄的log字段為空,已忽略", request_id)
 else:
 write_operation_log(f"第{i+1}條記錄不包含log字段,已忽略", request_id)

 log_content = "\n".join(lines).strip()
 write_operation_log(f"日志內(nèi)容構(gòu)建完成,共包含{len(lines)}條有效記錄", request_id)
 return log_content


 @app.route('/analyze-fluentd-log', methods=['POST'])
 def analyze_fluentd_log():
 """主接口:帶詳細(xì)日志記錄的請(qǐng)求處理"""
 # 生成唯一請(qǐng)求ID,便于全流程追蹤
 request_id = datetime.now().strftime("%Y%m%d%H%M%S") + f"-{os.urandom(4).hex()}"
 write_operation_log("收到新的請(qǐng)求", request_id)

 try:
 # 1. 記錄請(qǐng)求基本信息
 call_timestamp = datetime.now().strftime("%Y-%m-%d %H:%M:%S")
 write_operation_log(f"請(qǐng)求方法: {request.method}, 客戶端IP: {request.remote_addr}, Content-Type: {request.content_type}", request_id)

 # 2. 驗(yàn)證請(qǐng)求類型
 if request.content_type != "application/x-ndjson":
 error_msg = f"不支持的Content-Type: {request.content_type},僅接受application/x-ndjson"
 write_error_log(error_msg, request_id)
 return jsonify({
 "error": error_msg,
 "request_id": request_id
 }), 415

 # 3. 解析NDJSON數(shù)據(jù)
 write_operation_log("開(kāi)始解析NDJSON數(shù)據(jù)", request_id)
 ndjson_data = request.data.decode().splitlines()
 records = []
 for i, line in enumerate(ndjson_data):
 if line.strip():
 try:
 record = json.loads(line)
 records.append(record)
 write_operation_log(f"成功解析第{i+1}行NDJSON數(shù)據(jù)", request_id)
 except json.JSONDecodeError as e:
 error_msg = f"第{i+1}行NDJSON解析失敗: {str(e)}"
 write_error_log(error_msg, request_id)
 records.append({"message": line, "parse_error": str(e)})
 else:
 write_operation_log(f"第{i+1}行是空白行,已忽略", request_id)
 write_operation_log(f"NDJSON數(shù)據(jù)解析完成,共{len(records)}條記錄", request_id)

 # 4. 過(guò)濾有效日志記錄
 write_operation_log("開(kāi)始過(guò)濾有效日志記錄", request_id)
 log_records = [r for r in records if isinstance(r, dict) and 'log' in r and str(r.get('log', '')).strip()]
 write_operation_log(f"有效日志記錄過(guò)濾完成: {len(log_records)}/{len(records)}", request_id)

 if not log_records:
 error_msg = "未找到有效日志記錄(缺少log字段)"
 write_error_log(error_msg, request_id)
 return Response(
 json.dumps({
 "status": "ignored",
 "reason": error_msg,
 "raw_records_count": len(records),
 "request_id": request_id
 }, ensure_ascii=False, indent=2),
 mimetype="application/json"
 )

 # 5. 構(gòu)建日志內(nèi)容
 log_content = build_log_content_from_records(log_records, request_id)
 if not log_content:
 error_msg = "日志內(nèi)容為空"
 write_error_log(error_msg, request_id)
 return jsonify({
 "error": error_msg,
 "request_id": request_id
 }), 400

 # 6. 參數(shù)驗(yàn)證通過(guò),準(zhǔn)備啟動(dòng)后臺(tái)任務(wù)
 write_operation_log("參數(shù)驗(yàn)證通過(guò),準(zhǔn)備啟動(dòng)后臺(tái)處理任務(wù)", request_id)

 # 7. 啟動(dòng)后臺(tái)線程處理LLM調(diào)用
 thread = threading.Thread(
 target=run_async_task,
 args=(log_content, call_timestamp, request_id),
 daemnotallow=True
 )
 thread.start()
 write_operation_log("后臺(tái)處理線程已啟動(dòng)", request_id)

 # 8. 立即返回響應(yīng)
 response_data = {
 "status": "accepted",
 "message": "請(qǐng)求已接收,正在后臺(tái)處理",
 "timestamp": call_timestamp,
 "log_records_count": len(log_records),
 "request_id": request_id # 返回請(qǐng)求ID便于追蹤
 }
 write_operation_log("請(qǐng)求處理完成,已返回響應(yīng)", request_id)

 return Response(
 json.dumps(response_data, ensure_ascii=False, indent=2),
 mimetype="application/json",
 status=202
 )

 except Exception as e:
 error_msg = f"參數(shù)驗(yàn)證失敗: {str(e)}"
 write_error_log(error_msg, request_id)
 return jsonify({
 "error": error_msg,
 "request_id": request_id
 }), 400


 @app.route('/health', methods=['GET'])
 def health_check():
 """健康檢查接口,帶日志"""
 request_id = f"health-{datetime.now().strftime('%Y%m%d%H%M%S')}"
 write_operation_log("收到健康檢查請(qǐng)求", request_id)
 response = jsonify({
 "status": "healthy",
 "timestamp": datetime.now().strftime("%Y-%m-%d %H:%M:%S"),
 "request_id": request_id
 })
 write_operation_log("健康檢查響應(yīng)已返回", request_id)
 return response


 if __name__ == '__main__':
 print("Flask API 啟動(dòng)中...")
 print("環(huán)境變量配置:")
 print(f" - 從 .env 文件加載 DEEPSEEK_API_KEY: {'已配置' if DEEPSEEK_API_KEY else '未配置'}")
 print("日志文件路徑:")
 print(f" - 操作日志: {OPERATION_LOG_PATH}")
 print(f" - 錯(cuò)誤日志: {ERROR_INFO_PATH}")
 print("可用的端點(diǎn):")
 print(" - POST /analyze-fluentd-log - 接收日志并在后臺(tái)處理")
 print(" - GET /health - 服務(wù)健康檢查")
 app.run(host="0.0.0.0", port=5001, debug=True)
代碼是基于 Flask 框架的日志分析 API 服務(wù),用于接收并處理 EFK 體系中 Fluentd 推送的異常日志,結(jié)合 AI 大模型實(shí)現(xiàn)智能運(yùn)維分析。代碼首先加載環(huán)境變量獲取 DeepSeek API 密鑰,初始化異步客戶端;通過(guò)定義日志記錄函數(shù),實(shí)現(xiàn)操作日志、錯(cuò)誤日志的詳細(xì)追蹤,以及分析報(bào)告的 JSON 持久化存儲(chǔ)。核心接口/analyze-fluentd-log接收 NDJSON 格式的日志數(shù)據(jù),生成唯一請(qǐng)求 ID 用于全流程追蹤,解析日志后過(guò)濾出含有效log字段的記錄,構(gòu)建日志內(nèi)容并啟動(dòng)后臺(tái)線程,異步調(diào)用 DeepSeek 大模型生成根因分析報(bào)告(含標(biāo)題、異常原因、修復(fù)建議),最終將結(jié)果寫(xiě)入 JSON 文件。
測(cè)試
接下來(lái)需要將整個(gè)案例進(jìn)行測(cè)試,從日志文件生成到采集、分析、調(diào)用大模型。
日志生成與報(bào)表展示
由于需要生成測(cè)試的日志文件以及查看生成的智能日志,所以需要在 EFK 目錄下創(chuàng)建log_generator.py 和log_ui.py 分別完成上述功能。
import streamlit as st
 import json
 import re
 import os
 from log_generator import LogGenerator

 # 初始化日志生成器
 log_generator = LogGenerator()

 # ========================
 # 讀取 JSON 文件
 # ========================
 #file_path = r"report\incident_report.json"
 file_path = os.path.join("report", "incident_report.json")
 # 初始化reports變量
 reports = []

 # 檢查文件是否存在和讀取數(shù)據(jù)
 if os.path.exists(file_path) and os.path.getsize(file_path) > 0:
 try:
 with open(file_path, "r", encoding="utf-8") as f:
 reports = json.load(f)
 except json.JSONDecodeError as e:
 st.sidebar.error(f"JSON文件格式錯(cuò)誤: {e}")
 except Exception as e:
 st.sidebar.error(f"讀取文件時(shí)發(fā)生錯(cuò)誤: {e}")
 else:
 if not os.path.exists(file_path):
 st.sidebar.warning(f"?? 文件 {file_path} 不存在")
 else:
 st.sidebar.warning(f"?? 文件 {file_path} 為空")

 # ========================
 # 提取標(biāo)題(標(biāo)題在【標(biāo)題】后的下一行)
 # ========================
 def extract_title(report_text):
 # 去掉空行,逐行處理
 lines = [line.strip() for line in report_text.splitlines() if line.strip()]
 for i, line in enumerate(lines):
 if line.startswith("【標(biāo)題】"):
 # 找到【標(biāo)題】,取下一行作為真正的標(biāo)題
 if i + 1 < len(lines):
 return lines[i + 1].strip()
 else:
 return "未命名報(bào)告"
 return "未命名報(bào)告"

 # ========================
 # 按【字段】分段解析報(bào)告
 # 例如:分出 "異常原因分析"、"修復(fù)建議"、"異常日志"
 # ========================
 def split_sections(report_text):
 sections = {}
 # 用正則把【xxx】作為分隔符拆開(kāi)
 parts = re.split(r"(【.*?】)", report_text)
 current_key = None
 for part in parts:
 if not part.strip():
 continue
 if part.startswith("【") and part.endswith("】"):
 # 當(dāng)前是一個(gè)小節(jié)標(biāo)題,例如【異常原因分析】
 current_key = part.strip("【】")
 sections[current_key] = ""
 else:
 # 當(dāng)前是小節(jié)內(nèi)容
 if current_key:
 sections[current_key] += part.strip() + "\n"
 return sections

 # ========================
 # 側(cè)邊欄:搜索功能
 # ========================
 st.sidebar.title("異常報(bào)告列表")

 # 如果沒(méi)有報(bào)告數(shù)據(jù),顯示提示信息
 if not reports:
 st.sidebar.info("?? 暫無(wú)報(bào)告數(shù)據(jù)")
 # 右側(cè)主內(nèi)容區(qū)域顯示友好提示
 st.title("?? 異常報(bào)告系統(tǒng)")
 st.info("""
 ## 歡迎使用異常報(bào)告系統(tǒng)!

 ### ?? 當(dāng)前狀態(tài)
 - 報(bào)告數(shù)據(jù)文件未找到或?yàn)榭? - 請(qǐng)確保 `report/incident_report.json` 文件存在且包含有效數(shù)據(jù)

 ### ?? 如何添加數(shù)據(jù)
 1. 在 `report` 文件夾中創(chuàng)建 `incident_report.json` 文件
 2. 按照以下格式添加報(bào)告數(shù)據(jù):
 ```json
 [
 {
 "timestamp": "2024-01-01 10:00:00",
 "raw_log": "日志內(nèi)容...",
 "root_cause_report": "【標(biāo)題】\n報(bào)告標(biāo)題\n【異常原因分析】\n分析內(nèi)容..."
 }
 ]
 ```

 ### ?? 功能說(shuō)明
 - 支持按時(shí)間倒序查看報(bào)告
 - 支持搜索報(bào)告內(nèi)容
 - 自動(dòng)解析報(bào)告結(jié)構(gòu)并展示
 """)
 st.stop()

 # 倒序排序:最新的報(bào)告排在最前面
 reports_sorted = sorted(reports, key=lambda x: x["timestamp"], reverse=True)

 # 添加搜索輸入框
 search_query = st.sidebar.text_input("?? 搜索報(bào)告內(nèi)容(標(biāo)題/日志/分析/建議)").strip()

 # 判斷一條報(bào)告是否匹配搜索條件
 def report_matches(report, query):
 if not query:
 return True
 query = query.lower()
 if query in extract_title(report["root_cause_report"]).lower():
 return True
 if query in report["raw_log"].lower():
 return True
 if query in report["root_cause_report"].lower():
 return True
 return False

 # 根據(jù)搜索條件過(guò)濾報(bào)告
 filtered_reports = [r for r in reports_sorted if report_matches(r, search_query)]

 # 構(gòu)建側(cè)邊欄顯示內(nèi)容(報(bào)告生成時(shí)間 | 標(biāo)題)
 sidebar_items = [
 f"{r['timestamp']} | {extract_title(r['root_cause_report'])}" for r in filtered_reports
 ]

 # 沒(méi)有結(jié)果時(shí)提示
 if not sidebar_items:
 st.sidebar.warning("未找到匹配的報(bào)告")
 st.stop()

 # 側(cè)邊欄選擇框
 selected_item = st.sidebar.radio("選擇報(bào)告", sidebar_items)

 # ========================
 # 側(cè)邊欄:測(cè)試區(qū)域
 # ========================
 st.sidebar.markdown("---")
 st.sidebar.subheader("?? 測(cè)試數(shù)據(jù)生成")

 # 日志類型選擇
 log_type = st.sidebar.radio(
 "選擇日志類型",
 ["CPU"],
 help="CPU: 生成CPU使用率日志",
 )

 # CPU使用率輸入(僅在選擇CPU類型時(shí)顯示)
 cpu_usage = None
 if log_type == "CPU":
 cpu_usage = st.sidebar.number_input(
 "CPU使用率 (%)",
 min_value=0.1,
 max_value=100.0,
 value=85.0,
 step=0.1,
 help="輸入0.1-100之間的CPU使用率值"
 )

 # 生成按鈕
 if st.sidebar.button(f"生成{log_type}日志", type="primary"):
 with st.spinner("正在生成日志..."):
 result = log_generator.generate_and_save_log(log_type.lower(), cpu_usage)

 if result['status'] == 'success':
 st.sidebar.success(result['message'])
 st.sidebar.info(f"日志文件: {result['log_file']}")
 if 'log_content_preview' in result:
 st.sidebar.code(result['log_content_preview'], language="text")
 else:
 st.sidebar.error(result['message'])

 # 根據(jù)選擇找到對(duì)應(yīng)的報(bào)告
 selected_index = sidebar_items.index(selected_item)
 selected_report = filtered_reports[selected_index]

 # 提取報(bào)告標(biāo)題
 report_title = extract_title(selected_report["root_cause_report"])

 # ========================
 # 右側(cè)內(nèi)容展示
 # ========================
 st.title(report_title)
 st.subheader(f"**報(bào)告生成時(shí)間**: {selected_report['timestamp']}")

 # ---- 原始日志(默認(rèn)折疊) ----
 with st.expander("原始日志", expanded=False):
 st.code(selected_report["raw_log"], language="text")

 # ---- 根因分析報(bào)告 ----
 sections = split_sections(selected_report["root_cause_report"])
 # 去掉【標(biāo)題】部分,避免重復(fù)展示
 sections.pop("標(biāo)題", None)


 for key, value in sections.items():
 st.subheader(key) # 小節(jié)標(biāo)題,例如 “異常原因分析” st.markdown(value.strip()) # 小節(jié)內(nèi)容
啟動(dòng) EFK 服務(wù)
按照下圖所示,啟動(dòng) EFK 服務(wù),如果已經(jīng)啟動(dòng),建議重啟一下,保證配置文件修改之后可以生效。
維方案:技術(shù)架構(gòu)與實(shí)施步驟-AI.x社區(qū)")
啟動(dòng)分析服務(wù)
當(dāng)大模型(DeepSeek)接收到告警信息之后會(huì)生成對(duì)應(yīng)的報(bào)告。
執(zhí)行如下指令:
python process_log.py看到如下內(nèi)容的時(shí)候, 說(shuō)明該服務(wù)啟動(dòng)了。
Flask API 啟動(dòng)中...
 環(huán)境變量配置:
 - 從 .env 文件加載 DEEPSEEK_API_KEY: 已配置
 日志文件路徑:
 - 操作日志: /Users/cuihao/docker/EFK/api_operation.log
 - 錯(cuò)誤日志: /Users/cuihao/docker/EFK/api_error.log
 可用的端點(diǎn):
 - POST /analyze-fluentd-log - 接收日志并在后臺(tái)處理
 - GET /health - 服務(wù)健康檢查
 * Serving Flask app "process_log" (lazy loading)
生成測(cè)試數(shù)據(jù)
通過(guò)如下命令執(zhí)行啟動(dòng)測(cè)試和報(bào)告查看界面。
streamlit run log_ui.py如下圖所示,在打開(kāi)的 Web UI 界面的左側(cè),輸入 CPU 使用率為 85.5%,并點(diǎn)擊“生成 CPU 日志”。
維方案:技術(shù)架構(gòu)與實(shí)施步驟-AI.x社區(qū)")
觀察結(jié)果
由于日志文件寫(xiě)入了內(nèi)容, 日志采集服務(wù)、過(guò)濾服務(wù)以及處理服務(wù)都啟動(dòng)了,接下來(lái)就可以觀察日志處理的過(guò)程了。通過(guò)在容器中執(zhí)行 Fluent-bit 的日志文件可以發(fā)現(xiàn),它已經(jīng)采集到了對(duì)應(yīng)的日志信息,如下:
維方案:技術(shù)架構(gòu)與實(shí)施步驟-AI.x社區(qū)")
通過(guò)是在 Fluent-D 中也可以看到接收到的日志信息,如下:
維方案:技術(shù)架構(gòu)與實(shí)施步驟-AI.x社區(qū)")
ES + Kibana 日志展示
這里只是展示日志內(nèi)容,包含了正常和異常兩類數(shù)據(jù),但是沒(méi)有對(duì)智能日志的顯示。
配置確認(rèn)
ES和Kibana的鏡像版本都是使用的8.17.1,版本保持要一致,ES和Kibana服務(wù)的配置在docker-compse中。
維方案:技術(shù)架構(gòu)與實(shí)施步驟-AI.x社區(qū)")
ES的數(shù)據(jù)來(lái)自fluentd轉(zhuǎn)發(fā),由于轉(zhuǎn)發(fā)功能依賴fluentd的插件fluent-plugin-elasticsearch,fluentd的dockerfile文件中配置有安裝插件的命令,在通過(guò)docker compose生成容器啟動(dòng)時(shí)會(huì)執(zhí)行dockerfile中的命令安裝插件到fluentd容器中。
維方案:技術(shù)架構(gòu)與實(shí)施步驟-AI.x社區(qū)")
轉(zhuǎn)發(fā)到ES需要修改配置文件fluent.conf,通過(guò)服務(wù)名進(jìn)行轉(zhuǎn)發(fā)到ES。
維方案:技術(shù)架構(gòu)與實(shí)施步驟-AI.x社區(qū)")
KIbana鏡像中默認(rèn)配置連接到ES(ES默認(rèn)啟動(dòng)的端口是9200,如果ES的端口需要手動(dòng)修改,這里也需要改成相應(yīng)的端口)。
維方案:技術(shù)架構(gòu)與實(shí)施步驟-AI.x社區(qū)")
日志展示
我在 fluentd 中完成了到ES的轉(zhuǎn)發(fā)配置,并成功轉(zhuǎn)發(fā)才會(huì)生成索引。通過(guò)配置文件可以看出,Kibana的訪問(wèn)端口為 5601。通過(guò)如下地址:http://localhost:5601/app/discover#/ 訪問(wèn),如果首次Kibana打開(kāi)會(huì)提示創(chuàng)建數(shù)據(jù)視圖。
維方案:技術(shù)架構(gòu)與實(shí)施步驟-AI.x社區(qū)")
如下圖所示,在彈窗中配置名稱和匹配索引的規(guī)則。fluentd-*表示匹配所有fluentd-開(kāi)頭的索引,在右邊列表會(huì)顯示匹配的索引。
維方案:技術(shù)架構(gòu)與實(shí)施步驟-AI.x社區(qū)")
視圖創(chuàng)建完成后會(huì)跳轉(zhuǎn)到展示頁(yè)面,默認(rèn)顯示最近15分鐘的數(shù)據(jù)。
維方案:技術(shù)架構(gòu)與實(shí)施步驟-AI.x社區(qū)")
修改時(shí)間范圍,這里切換到15天,右邊的Refresh按鈕會(huì)變成Update。
維方案:技術(shù)架構(gòu)與實(shí)施步驟-AI.x社區(qū)")
點(diǎn)擊Update,就可以看到數(shù)據(jù)列表。
維方案:技術(shù)架構(gòu)與實(shí)施步驟-AI.x社區(qū)")
維方案:技術(shù)架構(gòu)與實(shí)施步驟-AI.x社區(qū)")
作者介紹
崔皓,51CTO社區(qū)編輯,資深架構(gòu)師,擁有18年的軟件開(kāi)發(fā)和架構(gòu)經(jīng)驗(yàn),10年分布式架構(gòu)經(jīng)驗(yàn)。